Showing posts with label DIY. Show all posts

Friday, 8 February 2013

Mini-Makeover for the Walk in Wardrobe

I am grateful that I have a walk in wardrobe.  It's lovely to be able to see all your clothes hanging there to decide what to wear.


When we first moved into this house over 12 years ago, the walk in robe just had a shelf and single hanging rail.  Several years ago, Dad lifted the shelf to 2 metres high so we could add a drawer unit and double-hanging.  The basic wardrobe units you can buy are pretty simple looking.


I decided mine needed to look a little nicer.  So I added some molding around the drawers and replaced the basic C-style handles with square pull handles.


I didn't repaint the whole drawer.  I just painted the molding white to match.  Screw on the new handles and voila!!!


Why can't they just make them like this?  Is it just that everything is made to look modern and I'm not a modern girl?


I also bought some clear acrylic shoe boxes from Howard's Storage World.  I have over 40 pairs of shoes.  Is that excessive?  I don't think so, but I'd be interested to hear how many other people have.


My friends on instagram know that I have a serious condition of repeat buying.  In this case it's white shirts.  I have a lot of them.


The old wardrobe insert?  Well it went onto my husband's side.  He'll have to wait until I'm motivated enough to buy and trim another wardrobe insert before his side looks as stylish as mine.


So that's the laundry cupboard and the walk in robe sorted.  I'm on a roll!  Have a great weekend everyone.

post signature

Monday, 12 November 2012

DIY Light Fittings - A Quick Makeover


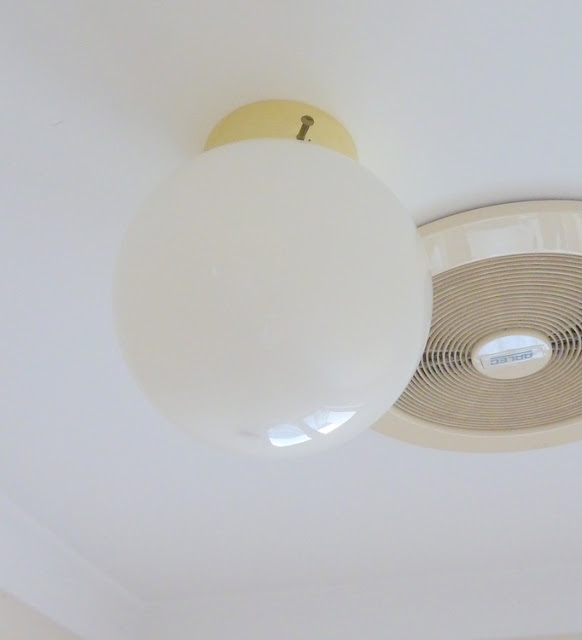
Hi.  Do you have ball lights in your house?  You know the really cheap do-it-yourself glass ball light fittings.  Well my whole house was full of them when we bought it.


Not the prettiest light fitting?  Over the years we have replaced many of the light fittings in our house, but I still have a few of these insect-filled balls haunting me.  I decided enough was enough and I was going to replace them myself.  Not being an electrician, my only option was to visit the shops for some DIY light fittings.  I must say I was pleasantly surprised.  The range of DIY lights on offer has improved greatly.  This is what I cam home with.


A beige fabric lampshade with pretty rows of crystals hanging down.  I hung this one in our staircase.  This is what it looks like lit up.


 This almost Moroccan style one is now at the end of our bedroom.


and finally this waterfall style chandelier in now in my walk-in-wardrobe.


It makes a pretty pattern on the ceiling when it's lit up.


It's a little bit like Fun and VJ's Murano chandelier here, that Anita used to replace her ball light.

DIY lights are so easy to install.  You simply remove the light globe.  Unscrew the collar on the batten, remove the existing DIY light fitting, place the new DIY light fitting in place, and rescrew the collar onto the batten.  Done in less that 5 minutes and it can completely change the look of your room.  The best bit is - If I decide I don't like them later on, I can just change them again.  No need to call an electrician.

post signature

Monday, 20 February 2012

Vanity Sink Makeover

The vanity unit in our powder room is a basic builders unit.  Nothing special.  I can't really justify ripping it out to install a new one, so I thought I'd see if I could pretty it up a bit.


I decided to add some decorative timber moulding and to paint over the pale green laminate doors.


I marked out where I wanted the moulding to go, and cut it to size.  I attached the moulding to the doors with builder's adhesive (liquid nails) and caulked gap filler (no more gaps) around the joins.  I also attached a piece of skirting board (base board) along the bottom.  To paint over the laminate, I used Zissner 123 primer followed by a couple of coats of Dulux aquaenamel in Whisper White.


I think it looks prettier now.  Not so much like a builder's unit.


A few years ago I replaced the standard builder's mirror with this one.


It was about $50 from the discount store.  It was bright gold but I liked the ornate detail in the frame and the bevelled edge on the mirror.  Originally I painted it in a matt white paint and it looked like a plaster frame.  I have since painted it in a gloss paint.  I probably like the matt paint better but it was really hard to keep clean.


This is the sign on the door.  There's no bath in the powder room, so that might confuse guests a little?


Wednesday, 1 February 2012

DIY - How to Restore a Shower

I hate cleaning showers.  Especially as our ensuite shower is 13 years old and when you clean it, it never looks shiny and new again.  It's so frustrating - It feels like such a waste of time.  I would dearly love a new ensuite, but the reality is, it will be a number of years before we can renovate it.  So if I have to live with this shower for the next few years, it was going to need a little restoration.

Step 1 - Replace the cheap water saving fixed shower head with a massage shower head on a rail, so it is easy to clean the shower.


I chose the Methven Amio 5 function shower head.  Oh yeah!
Pinned Image
 Step 2 - I can't look at these feature tiles any longer, so I painted over them with Zissner 123 primer and 2 coats of white gloss paint.  You can buy specialist tile paint, but it wasn't worth it for me as I only had to paint 3 tiles.


Step 3 - Rejuvenate the grout.  After 13 years the white grout was no longer white.  I didn't want to have to scrape out and re-grout the whole thing.  So firstly I cleaned the whole shower with a good mould cleaner. 

Selleys Rapid Mould Killer

Then I wanted to freshen up the grout.  Originally I tried one of those white grout pens, but it didn't really work well.  I think they are really designed for drawing fake grout lines over painted tiles rather than making real grout lines white again  Then I discovered Selleys Grout Stain Whitener. 

Selleys Whitener

This stuff is great.  It's basically pre-mixed white grout in a tube with a sponge applicator.  Squeeze it on over the grout lines, let it dry for 30-120 minutes, and when dry wipe over the tiles with a sponge to remove the excess grout.  I found a flat sponge rather than a cloth (Chux) worked best.  Here's the tiles with the grout squeezed on:


and here's how they turned out:


Honestly - They look brand new.

The final step in the restoration process was the glass shower screen.  For this I used Enduroshield.

It's a protective coating for glass.  It's a two part process.  Firstly you clean the glass with the cleaning solution and some fine steel wool.  Then you seal the glass with the sealer.  Once the sealer has cured (about 8 hours) like the box says - It's like water off a duck's back.  The water just beads on the glass.  A quick wipe over with a micro fibre cloth and the shower screen sparkles like new again.  Oh why didn't I do this earlier?

So here's my finished shower


I was so happy with the way it turned out that I also used the grout whitener and Enduroshield sealer on the downstairs shower.  The shower has been done for a few weeks now, and it is so much easier to clean.  Well worth the effort.

This is not a sponsored post.  These are just the products I used and I thought they were great.

Monday, 23 January 2012

Rust proof your Outdoor Lights

When we built our outdoor entertaining area, I was trying to save money (as always) and bought an IKEA light fitting to hang above the table.  Unfortunately it was made of wrought iron and over the years it has rusted and is basically ... well it's stuffed! 


I was worried the chain was so rusted that the light would come crashing down.

I have been looking for another light to replace it for quite some time and have seen a few I like but $1,000 for a light fitting .... really?  The IKEA one was only $79.  I have finally found a new light fitting.  Unfortunately it is also made of some type of iron so to prevent the same thing happening again, I had to give it a spray of Rust-Guard metal paint before the electrician installed it.


Here's the light hanging in my garage so I could paint it. 
It's a six pendant lantern light - $179 on special from Recollections.


It's an antique bronze colour, so I chose black rust-guard paint.

and here it is...


I think the black works better with the dining chairs than the antique bronze.


and at night...


So here's a lesson learnt.  If you have metal objects outside, it may well be worthwhile to rust-proof them in the beginning.

Happy back to school in Queensland today.

Monday, 14 November 2011

Rental Reno - The Bedrooms

Part 4 of the renovation of our rental cottage was the bedrooms.  It really came down to fresh paint, new carpet, window coverings and light/ceiling fans.  Room by room, here are the before and afters.

The Master Bedroom - Before

Look at those curtains - I'm at a loss for words.


Oh dear - seems it wasn't only the shower that was leaking.  The roof was also leaking.  We had to pay a roofer to take off every single roof tile and replace the tile clip, then put each tile back on again.  The quotes for this work varied enormously, so it pays to shop around.  There was water damage to the ceilings throughout the house, so all the ceilings were patched and painted.

Here is the Master Bedroom After


The walls are freshly painted in Dulux Antique White, and we added a Mitsubishi split system air-conditioner.


I replaced the frilly curtains with the same ones I used in the lounge room from Curtain Wonderland.


and I polished the parquetry floor.

Bedroom 2 - Before


The last tenant left the blinds up like this hoping we wouldn't notice that the slats were all broken.


Burgundy painted feature alcoves?


Blue colour still inside the wardrobe.


Old wallpaper around the power switch and the carpet is revolting.

Bedroom 2 After


New eco-timber privacy blinds from Curtain Wonderland.


The walls and alcoves painted in Dulux Antique White.


New carpet laid - Beat Street 100% polypropylene in Sandcastle on premium underlay from Choices.

Bedroom 3 - Before


The same bad paint and carpet.


Vertical blinds - a personal pet hate of mine.


An old ceiling fan and only 2 wall lights.  No overhead lights. 

Bedroom 3 After


Bedroom 4 Before


Mustard walls with blue-grey carpet.


A non-working ceiling fan and only wall lights again.


Vertical blinds (aaarrrggghhh!!!!)

Bedroom 4 After


I also bought some new wall lights to get rid of the balls.


When I went to the house the other day, the electrician had been and installed them .... upside down!!!!  When I rang and told him they were upside down he said "that makes me look a bit stupid doesn't it?".  I thought - do you really want me to answer that?  It just goes to show, you really need to be there to supervise don't you?

We also did a little bit of work outside and in the garden.  Hopefully we will find some lovely tenants who will be very happy living there.  Now I can focus my attention back to my house and all the jobs that need to be done here.
Related Posts Plugin for WordPress, Blogger...