Monday, 6 June 2011

Hail From Above

On Wednesday, the eastern suburbs of Brisbane was hit by a a freak hail storm.  I had heard a warning on the radio at 3pm that it was expected to hit Macleay Island within half an hour, so I knew it would reach us at about 3.45pm.  The exact time that I needed to pick up my son from the bus stop after school.  What was I going to do?  Hail storms here can be really severe - the size of golf or tennis balls which can really mess up your car, but I couldn't exactly leave my son to stand in the street during a hail storm.

My daughter who was already at home did not want to go out in the car if there was going to be a hail storm.  She said she would be much happier to wait at home where it was safe.  So I locked up the house and raced to get my son.  Of course the storm hit as soon as I got to the bus stop.  Thankfully the hail was small but there was so much of it.  I rang my husband to tell him what was happening and to let him know that I had driven his car to the bus stop (I wasn't silly enough to drive mine) and I could barely hear him over the noise of the hail hitting the car roof.

Finally the bus pulled up and my son and his mate ran to the car.  They said the hail hurt their heads when it hit them.  When I got home I immediately called out to see that my daughter was OK and she wasn't frightened by the storm.  She was fine.  In fact, she was quite chirpy and then she pulled out the camera and showed me some of the 47 photos she had taken.


She took a photo of a hail stone to show Dad

And then the storm was over

Friday, 3 June 2011

The Guest Bedroom Furniture Makeover

The guest bedroom doesn't have a lot of furniture - a bed, bedside tables and a bench seat.  In my effort to have the room ready for my sister's visit I decided to give them a freshen up.

The Bedhead

I bought the ensemble when I was 20 years old.  It was my first 'big' bed.  It's still in very good condition so all I've done is purchase one of those comfy, fluffy mattress toppers.

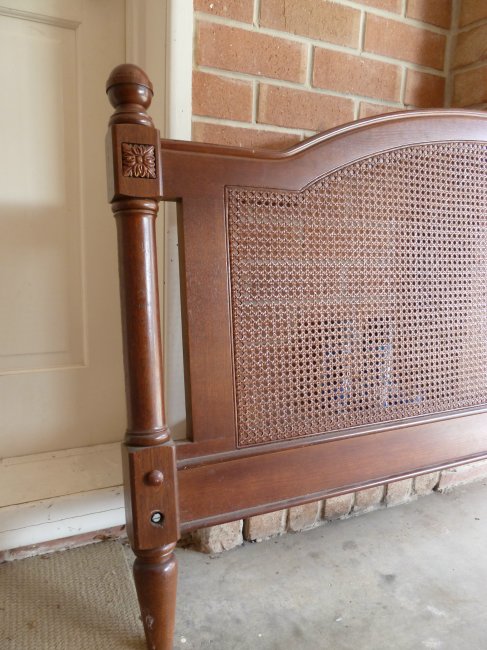
I like a bedhead behind an ensemble.  I think it makes the bed look finished and keeps your head away from the wall.  I don't really like bed foots as they can visually close off a room and I like to sit on the end of the bed and bed foots just seem to get in the way.  A little searching on eBay and for $21 (yes that's right only $21) I found this....


It was a bed head and foot but was missing the side rails.  The ornate carving was missing from the top of the bedhead but there was one on the bed foot and both pieces had lovely carving in the posts.


I was able to gently chisel the top carving off the bed foot and glue it onto the bed head.  Then I gave the bedhead a sand and a coat of paint and it turned out like this ......


My beautiful white bedhead


The Bedside Tables

I've owned the bedside tables since I was a teenager.  My Dad made me a piece of timber that I sat across the two tables to form a desk.  After I finished studying, I used them as bedside tables. 


Terrible Photo taken years ago but you get the idea of how it looked
They were simple pine bedside tables but they had nice decorative moulding and dove-tail joints.  Over time the centre panel of the doors had cracked and opened up.  I removed the the centre insert from the door frame and replaced it with chicken wire.  Gave the whole thing a sand and paint and changed the drawer knobs from brass to crystal.  It took a while and tested my carpentry skills but I'm really happy with them now.


Chicken Wire Insert
I also have a timber bench seat to go in the guest bedroom which I have also painted white.  I'll post some photos of this shortly.

The guest bedroom is really starting to take shape.  Now I need to empty the room to re-paint it.  I don't like painting walls and using the roller.  You really have to be in the mood don't you?  Just waiting for that mood to arrive.....


I am so proud of this project that I am sharing it at these lovely blogs


Feathered Nest Friday

Tuesday, 31 May 2011

Vintage Style Handmade Cards

I have a lot of birthdays coming up in June, so I decided to be proactive and make some vintage style cards.  It's so much easier to have a selection of cards on hand than to try and buy or make a card at the last minute.  I think a hand made card really shows the person how much you care.  I am always touched when I receive beautifully made cards.


I bought a pack of plain cream cards from the craft store and these are the cards I made.


I stamped the damask scroll and placed a small crystal in the centre.


For this card, I cut a scrap of beige linen fabric and frayed the edges by pulling out threads.  I used spray adhesive to attach it to the card and then pinned this lovely vintage style butterfly brooch through the card.  I think this is a lovely gift all on its own.


For this card I thread a chocolate brown velvet ribbon through a square diamante buckle, then glued it to the card.


I picked some small twigs from our garden and thread one through the shank on the back of this diamante button.  I attached it to the card with a hot glue gun.


This is one of my favourites.  I traced a bird stencil onto some 'script' scrap booking paper and glued it to the card.  I then broke off a piece of twig so it looked like a tree branch and glued it under the bird.  I used a black felt pen to draw in some feet so the bird was perched on the branch.


This is more of a cute fluffy bird.  Again I cut out a bird shape from patterned paper, then attached a collection of feathers to the wing and a small self-adhesive crystal for the eye.


Lastly I made a Happy Birthday swing card.  I stamped the script dress and coloured in a strip across the waist to look like a belt and added a little crystal.  I also stamped the Happy Birthday and then threaded through a piece of organza ribbon.

I have a small selection of stamps that have different greetings on them such as Happy Birthday and Many Thanks, so I can quickly stamp inside each card when I write on it.

Happy Birthday to all my Gemini friends.

The Lettered Cottage
Todays Creative Blog

Monday, 30 May 2011

Girl's Weekend Hamilton Island

I am incredibly lucky.  I have just spent the weekend with three of my dearest friends at the stunningly beautiful Hamilton Island in The Whitsundays. 


We all met when our boys (all our eldest children) started at the same school in Prep (Reception).  Our boys are all now at different schools, but we have remained friends. 


We don't see each other every week or spend hours talking on the phone - we just pick up our friendship from wherever we last left it.  There's no "Why haven't you called me?", just lots of squealing, laughing, talking and hugs.


Your friendships with your girl friends are unique.


I will cherish the memories I have of this weekend, as I cherish my friendships with these lovely ladies.


I have made them all a Thank You card with this photo inside.


Thanks for a great weekend!

Friday, 27 May 2011

Customising A Bed Valance

I needed a plain white bed valance to hide the bed ensemble in the guest bedroom.  That was until I saw this photo in a Pottery Barn Catalogue.


Image from Pottery Barn
Those simple buttons sewn at the top of the box pleats make all the difference.  So off to Spotlight (craft & home furnishings shop) I go and purchase a plain white queen size box pleated valance for $36.  I search through my button jar and find 5 pretty mother of pearl shell buttons.


I've sewn the buttons about 10cm (3 5/8 inches) from the top of the pleat, being careful to keep the pleat lines straight as I sew.


I'm happy with the results.  I think the buttons add a small touch of special to what is otherwise a very plain and basic item.  Thanks for the idea Pottery Barn.

Wednesday, 25 May 2011

Stylish Setting - Adding a Special touch to the smallest room in the house


We have a small bathroom downstairs called the 'Powder Room' on our house plans.  Basically it's the loo that your guests use.  As it is the one room in your house where your visitors have time to notice the decor, I wanted to make it pretty and give them something to look at.


I wonder how many curious visitors are tempted to open the little medicine cupboard hung above the toilet and look inside?


This pretty collection of china belonged to my grandmother and her cousin, Isabelle.  The little framed flower was from Target (yes, during their shabby chic phase) and the small flower in the shot glass is by Sia in London.


I found this pretty botanical print in a discount store, and painted the frame white giving it a little rub back so it looked old and loved.


I had this love heart toilet roll holder made by a local wrought iron maker.  I painted it the same colour as the walls.  Sometimes it's the little touches that make a room special.

Linking today at


Monday, 23 May 2011

I'm Grateful for Fresh Flowers

I love fresh flowers.


Lavender at Kew Gardens, photo taken by my son on a school excursion

In Melbourne and Sydney all the high street greengrocers have buckets of fresh flowers out the front.  In London, Northcote Road had a number of flower stalls filled with beautiful flowers, especially peonies.  Here in Brisbane if you were to put fresh flowers outside your shop they'd be wilted from heat and humidity very quickly.


Rain forest Flower at Mt Tambourine, photo taken by my husband

When my husband and I lived in Sydney I would often by flowers from the street stall on the way home from work or on a Saturday morning when I walked up Glebe Point Road. I would do the same in Northcote Road, but back here in Brisbane I've barely bought a bunch. 


Daisies at Kew Gardens, photo taken by my son on a school excursion


When we eventually get around to re-planting our front garden beds, I want to fill them with flowers that I can cut and bring inside.  In the meantime I will just have to treat myself to some bought flowers.

Lilies from Suzi

I like simple floral arrangements, not the overly fancy ones you see in florists.

Take time out of your busy life to stop and smell the roses, or gardenias, or whatever flowers you enjoy.
Related Posts Plugin for WordPress, Blogger...