Monday, 3 December 2012

Whole Roasted Salmon in Paper on the BBQ

The main dish for my Seafood OMS friendly Christmas menu is a Jamie Oliver recipe that my husband cooks often.  I love it because it's salmon, has a lovely smoky flavour and my husband does the cooking.


Ingredients:
A fresh whole salmon, scaled and gutted.  The one we usually buy is about 2kg/4.5lb
3-4 handfuls of fresh mixed herbs - I used parsley, basil and chives this time.  Jamie also recommends fennel tops.
2 lemons, finely sliced into rounds
3-6 green onions sliced (depends on your tastes)
4 teaspoons of fennel seeds, cracked
EVOO (extra-virgin olive oil)
Salt & pepper to taste


Method:

Rinse the salmon and pat dry.  Season the fish inside and out, rub a little EVOO (optional) and stuff half the herbs inside the cavity.


Now Jamie cooks this fish in newspaper, which when cooked on the BBQ gives the fish a smoky flavour.  I'm not entirely sure I want to eat fish that has been cooked with the ink from the newspaper, so I use about 20 sheets of white butcher's paper that I get from the fishmonger when I buy  the fish.


Place the salmon in the centre of the paper, scatter over the lemons, green onions, fennel seeds and remaining herbs - also put some underneath the salmon.  Drizzle with a little extra EVOO (optional).  Wet the paper with a little water.


Now you need to wrap the fish in the paper.  Tuck each of the sides in and fold the paper over.  There's no real method.  You just want to wrap the whole fish quite tightly.  Using kitchen string, wrap the string around the fish's head and tie in a knot.  If you know how to do the whole cheffy knot-tying style, then do that, otherwise my husband just wraps the string around the fish and secures it.


To stop the paper catching fire, you need to wet it really well.  Place the fish under a running tap and wet the paper & string thoroughly.


Cook the salmon in a pre-heated BBQ or oven at 220C/425F for about 35 minutes, depending on the size of your fish and how well-done you like your salmon.  Our BBQ has a lid on it, so we can control the temperature.  If you are cooking it on an open BBQ, Jamie recommends 25 minutes each side.
 Note - Jamie uses a 1.5kg fish for these times.  We use a 2kg fish and cook for an extra 5 minutes.


To serve, cut the paper open and watch all the steam escape.  We then place the fish on a platter and serve portions at the table.


For a winter menu - serve with roasted vegetables and green beans and broccolini drizzled with a little EVOO, lemon juice and toasted flaked almonds.

For a summer menu - serve with boiled baby potatoes dressed with herbs and a little EVOO (serve hot or cold), and your favourite green salad.  I often use a mango and avocado salad with this fish.


If you don't want to use paper, wrap the fish in double-thickness tin foil and a sheet of baking paper and roast.  You can also use fish fillets instead of whole fish.  Just reduce the cooking time.

This recipe comes from Jamie Oliver's book Happy Days with the Naked Chef.  Next to this recipe he shares his thoughts on seafood, and hopefully without breaking copyright I wanted to share a couple of them with you:
 'When you look at the way Spanish/Italians/Japanese live, and at their statistics of life expectancy, their consumption of fish seems to play a large part.  I don't think any doctor has ever ruled out the fact that fish is really good for your diet ....do yourself a favour - eat fresh fish at least twice a week'.  

You heard the man - Enjoy the fish!


post signature

Saturday, 1 December 2012

Seafood Starters for Christmas

I love seafood all year round, but especially at Christmas.  As part of my OMS Christmas menu, I've come up with a selection of seafood starters sure to impress your family at Christmas.


Fresh Oysters with 3 Dressings

Now you either love or hate oysters.  My husband loves them.  When we first started dating we went to a seafood buffet and he helped himself to over 70 oysters!!!  Here, I bought some South Australian Coffin Bay oysters and prepared 3 simple dressings.  To make the dressings, just place all the ingredients into an empty jam jar with a lid and shake to combine.


Lime Dressing - 1 tablespoon (3 teaspoons) lime juice, 1 tablespoon caster sugar, 1/2 teaspoon grated lime zest, 1 tablespoon chopped mint.  To make this sauce spicy, you could add a little chopped chilli or chilli sauce.

Vinaigrette - 1 tablespoon extra-virgin olive oil, 2 teaspoons vinegar (I used red-wine vinegar) and half a French shallot finely diced (1-2 teaspoons).

Sesame & Soy - 1 tablespoon light soy sauce or tamari, 1 tablespoon rice wine vinegar, 1 teaspoon sesame oil, 1 teaspoon finely shredded ginger.


These dressings are best made just prior to serving.  You can make them ahead of time, but don't add the mint to the lime dressing until you are ready to serve or it will turn brown.


Fresh Cooked Prawns with 2 Dipping Sauces

Prawns (also called shrimp) are a filter-feeder which means they strain food particles from the water.  The quality of the prawn depends on the quality of the water they live in.  I only buy fresh Australian & New Zealand prawns.  The prawns I've used here are wild caught Eastern King prawns caught off the Queensland coast.

Sweet Chilli & Lime Dipping Sauce - mix together 2 tablespoons (6 teaspoons) sweet chilli sauce, 1 tablespoon lime juice and 1 teaspoon fish sauce (optional).


Mango & Mint Dipping Sauce - puree half a mango cheek (100g/3.5oz) with a stick (immersion) blender, then add 2 teaspoons lime juice (or to taste) and a couple of teaspoons of freshly chopped mint.  I also added some chopped red chilli (optional).  To make a creamier version of this sauce you can add a tablespoon of Greek-style soy yoghurt.


You can make these sauces in advance and keep them in the fridge.  Don't add the mint to the mango sauce until just before serving.  These sauces would easily do 1-2 kilograms of prawns.

To serve, put the prawns on a platter with the dipping sauces.  Don't forget to put out a container for the shells and maybe some bowls filled with warm water and lemon to wash fingers.


To make individual servings, place the prawns in a glass just like when you order a pint of prawns at the pub.


Mini-Crab Salad Canapes
Makes enough salad to fill 24 cucumber cups
1 avocado, peeled, de-stoned and diced into small cubes
200 grams/7 oz crab meat
squeeze of lemon or lime juice
salt & pepper to taste

Dressing:
2 tablespoons flax seed oil or extra-virgin olive oil
1 tablespoon apple cider vinegar
1/2 teaspoon mustard (I used Dijon)
1 teaspoon honey


To make the dressing, mix all the ingredients together in a jam jar and shake well.
Pick over the crab meat to check for shells, and place the meat in a bowl.  Add the avocado, squeeze of juice and season.  Pour the dressing over the crab and gently fold it through.


I served the crab salad in cucumber cups so they would look good and add some crunch to the salad.  To make cucumber cups, use a melon baller to remove the centre section, then cut the cucumber - mine ended up being about 2cm thick.


Other ways to serve the salad would be - on witlof leaves (bear in mind, these are bitter tasting), thin slices of apple, small pieces of toasted bagel, and many homewares shops sell special spoons and dishes for serving canapes.


So there are some tasty seafood starters.  If you wanted a cold seafood collection as a main, you could easily add some lobster, crayfish, Moreton Bay or Balmain bugs to the mix and you would have a seafood feast.

Thank you to the lovely Emily, on my MS retreat, who gave me some photography tips.  It helps to know what a light meter is.


Sharing at It's Overflowing

post signature

Thursday, 29 November 2012

Decorating Christmas Crackers or Bon Bons

How's your Christmas planning going?  Started yet?  I've only bought a couple of presents, but I've made the Christmas crackers.


Every year I make Christmas Bon Bons or Crackers.  I don't know why?  I must be crackers.  I think it's because I don't like the tacky gifts they put inside the store-bought ones or the cost of the 'luxury' crackers.  This year I cheated a little and bought a kit, which made it so much easier.  This silver kit is $3 at Spotlight and includes 6 pre-cut crackers, snaps, ribbon ties, party hat and bad jokes.


Here's how to make them.  I didn't want plain silver, so I decided to decorate my crackers with a simple white doily.  Just glue it on (it's a bit messy).  Turn the cracker over and tape down the snap towards the back of the cracker.


Then I added an embellishment.  These silver snowflakes were $2 for 6 from Overflow.  There are so many pretty decorations available, just choose something flat that can be attached easily.


I attached the snowflake to the cracker with a hot glue gun, then folded the cracker into shape.  Use a gentle up/down motion to get the tabs into the slot.


Now tie a piece of ribbon or string around the bottom of the cracker.  I decided to use the silver ties that came with the packet (both packets were one tie short Spotlight!!!) as I wanted the doily to be the feature.  Previously I've used pretty ribbon so it becomes the feature.  Now you can fill the cracker.


I used the hats and jokes that came in the packet and added some Christmas Lindt chocolates.  These are the same chocolates I used for my Lindt Chocolate Christmas Tree last year.  Other gifts I've used before include; lipsticks, key rings, beaded bracelets, earrings, scratchy tickets, lollipops ....  You can use pretty much anything that will fit inside the cracker.  You can also type up your own jokes or write inspirational messages to put inside.  Once the cracker is filled, tie-off the other end and it's finished.


Sparkly Snowflakes (leave glitter everywhere)


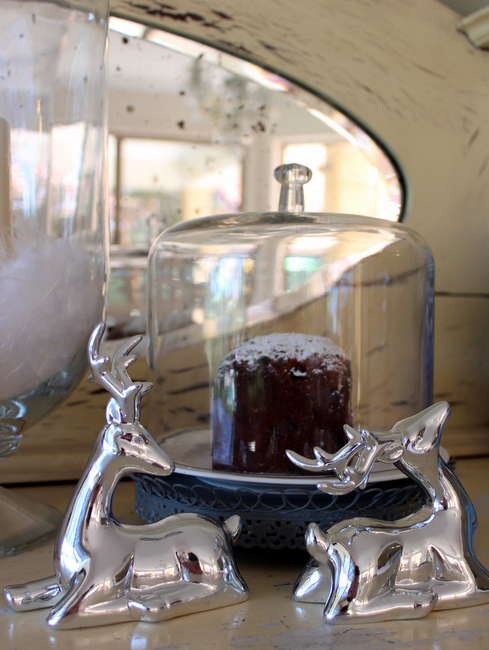
I'm not hosting Christmas at my place this year, but if I was I'd decorate the table with these pretty silver reindeer - $4 each from KMart


and I'd bring in some roses from the garden, and pop them in little silver votives.


I'd use the new silver charger plates I picked up from KMart for $2 each, and hopefully my table would look like this.


If any of you have any suggestions for what gifts you can put into a Christmas Cracker, please share it with us in the comments section below.

To see more Christmas decorating, please visit my new blog DIY Decorator


Monday, 26 November 2012

A Christmas Menu Coming Soon


Oh my goodness - I'm exhausted.  I made and photographed an entire Christmas menu on the weekend.  I'll share it with you shortly.


This is a little Christmas cake I made.

We also managed to get the tree up on the weekend.


My little helper did nearly all of it herself this year.  I helped with the tree and the lights but she did the decorations, and I think she did a mighty fine job.  Hope all your Christmas preparations are coming along.  There are only 28 days until Christmas eve.

post signature

Wednesday, 21 November 2012

A Menu Chalkboard


Hi everyone.  Guess what?  I've made another thing from my Pinterest things to make list. See - set yourself a goal and you will achieve it.  This is my chalkboard menu.


How I Made It

Before I went to the hardware store, I shopped at home first.  I found a piece of plywood in the garage that I'd used to line the bathroom shelves, a spray can of chalkboard paint that I used to make my chalkboard placemats, and some rope I used to wrap my mum's present. That was everything I needed - no need to go to the shops.

Cut & Drill
I cut the plywood to about 50cm wide x 70cm tall.  I used a jigsaw to cut the curves out of the top.  Then I used the biggest drill bit I had to make two holes for the rope to go through.  Two power tools in one day - I am women, hear me roar! LOL.

Paint
When I was happy with the size and shape of the chalkboard, I painted it with undercoat.  I use Zissner.  Once it was dry, I gave it a light sand.  Then I sprayed it with 2 coats of chalkboard paint, giving it a light sand between coats.  You want a smooth surface to write on.


Distress
Freshly painted chalkboard is lovely and black but I wanted something a little more distressed and old looking.  This is what you do ... Ignore the chalkboard paint instructions that say to leave the chalbkoard paint to cure for 24 hours before using.

After the final coat of chalkboard paint is touch dry, about 1 hour, grab yourself some white chalk.  You wouldn't think that would be hard but the only place I could find white rather than coloured chalk was at Typo.


Get a piece of chalk and rub it all over the chalkboard.  Use a dry cloth to wipe it off.  Now get a damp cloth and do some random dabbing and wiping.  When it dries you will be left with a softer dabbled look.  I also sanded the corners and edges to expose some of the plywood.


Finally I thread through the rope, tying knots at the ends, and hung it up above the BBQ.


Here's a close up of the rope and edges.


and here you can see the splotchy effect on the chalkboard.


So the outdoor kitchen is taking shape.


Really need to makeover my Dad's old butcher's block to go under the clock.  Add it to the To Do list.


I'm now planning an OMS-friendly Christmas menu.  Hope your Christmas planning is coming along.  Just over one month away now.

Monday, 19 November 2012

A Winner & Some News

Thank you to all of you who entered my Thank You Giveaway, for the silver hearts.


The winner is Deanne from Five Brothers One Sister

True Random Number Generator

2Powered by RANDOM.ORG
Some Exciting News & A Few Changes

As you know, after I was diagnosed with MS, I was determined to do whatever it took to stay healthy and live a happy life.  I settled on the Swank diet and Overcoming Multiple Sclerosis (OMS) Recovery Plan.  That meant big changes to my diet (and subsequently my family's diet).  I eat no dairy - no milk, cheese, cream, sour cream, yoghurt or butter.  The only meat I eat is seafood.  I don't eat any processed foods - no cakes, biscuits, sausage rolls, no take-away.  Pretty much nothing from a bakery other than the bread and I skip half the aisles in the supermarket.


The first few months were really tough.  I had to stop and think about everything I ate.  I had to find new recipes and re-invent old ones.  I had to find ways to prepare family meals so my dietary needs were met without always having to cook separate meals.  I had to be organised.  Plan my meals in advance, and remember to take food and soy milk with me.


It was a challenge.  It was also the reason I started The MS Foodie part of my blog.   Well now I have a new challenge.  The Overcoming MS team would like me to share my OMS friendly food and ideas with their members who are going through the same struggles and adjustment that I am.  As a result, my recipes will address the specific needs of people who follow the OMS diet.  In the past, I've tried to keep it more general so the recipes would have a broader appeal.  It also means I may post more recipes than before.  Now I know that some people are only interested in home decor, some people are only interested in the recipes and some like both.  I thought about making The MS Foodie a separate blog but it's enough work maintaining one blog let alone two.


I am really excited to work with the OMS team on this.  The recovery plan I follow is not a short-term diet but a long term commitment  that I am passionate about, and if I can help other people in my situation then that's what I really want to do.  I hope all you home decorating people will understand, but don't worry, there will still be plenty of DIY and making things happening around here.

post signature
Related Posts Plugin for WordPress, Blogger...