Thursday, 17 November 2011

Controlling Clutter - Finish the Cycle

I like to think I'm pretty organised and keep my home fairly neat and tidy but I have a few hot spots that are just a magnet for clutter.

I was listening to the radio on Sunday morning as I drove my daughter to dancing rehearsals (3 times).  There was a man on air talking about controlling clutter and he made 2 points that really appealed to me.

First - Finish the Cycle

He used the analogy of a washing machine cycle.  If you were to run a load of washing and turn it off after only 15 minutes, then come back to it in 3 days, you would find a mess of wet smelly mouldy clothes, and you would have to start all over again to get them clean.  So it is easier to finish the cycle than to start and stop.

He gave an example of how to apply this.  For example, when you bring the mail in and open it, don't just leave it on the kitchen bench.  Finish the cycle.  Put the junk mail straight in the bin, and put the other mail in your 'to do' or 'bills to pay' folder/tray so you can find them and deal with them.  I am guilty of this.  I create piles of paper and then get cross when I have to look for some form that needs to be returned to school,or find an overdue bill under one of the piles.


My daughter wrapped a birthday present on the weekend and left everything on the floor - the paper, scissors and sticky tape.  She needed to finish the process by putting everything away rather than stopping half way through the cycle.  This concept of seeing the cycle through to the end and finishing makes sense to me.

Secondly - Ban the word Later

The man on the radio said ban the word 'later'.  In other words, don't just open the mail and think 'I'll put it away later'. DO IT NOW.  Like the Nike phrase - Just do it!

NIKE Just do it logo

If I can try to implement just these two things, I think I will go a long way towards controlling the clutter in my life or at least on the kitchen bench.
Tuesday, 15 November 2011

Musical Cushions

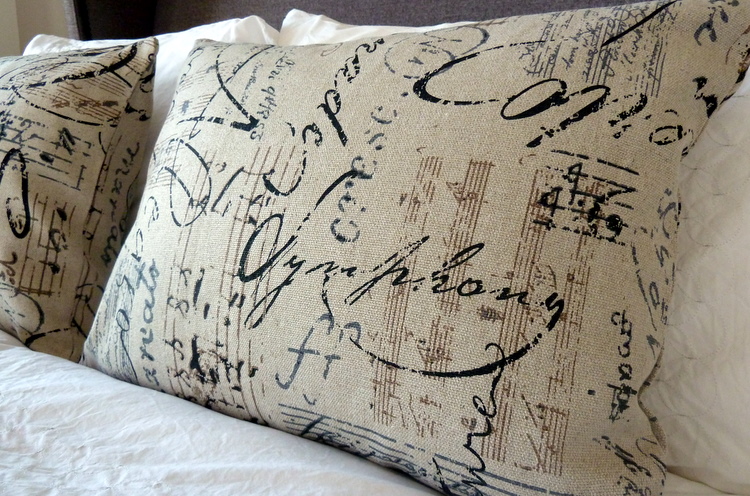
Now that I'm finished down at the rental house, I finally got around to sewing cushions (pillows) for my bedroom from the musical script fabric I bought.


I love the Symphony and music bars.


The dark script works with the striped cushion in front.


I think having the mid-tone fabric on the bed helps to give harmony to the room as it links the curtains and wall colour to the bed.   That's technical speak for I think it matches.


Another job to tick off the list.

Sharing at
Home Stories A to Z - Tips & Tutorials Tuesday
A Beach Cottage - Good Life Wednesday
French Country Cottage - Feathered Nest Friday
My Romantic Home - Show & Tell Friday
Freckled Laundry - Air Your Laundry

Monday, 14 November 2011

Rental Reno - The Bedrooms

Part 4 of the renovation of our rental cottage was the bedrooms.  It really came down to fresh paint, new carpet, window coverings and light/ceiling fans.  Room by room, here are the before and afters.

The Master Bedroom - Before

Look at those curtains - I'm at a loss for words.


Oh dear - seems it wasn't only the shower that was leaking.  The roof was also leaking.  We had to pay a roofer to take off every single roof tile and replace the tile clip, then put each tile back on again.  The quotes for this work varied enormously, so it pays to shop around.  There was water damage to the ceilings throughout the house, so all the ceilings were patched and painted.

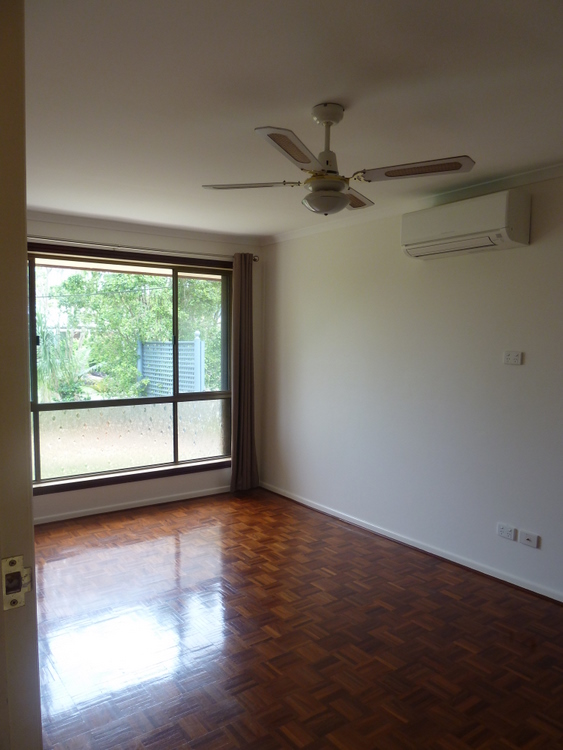
Here is the Master Bedroom After


The walls are freshly painted in Dulux Antique White, and we added a Mitsubishi split system air-conditioner.


I replaced the frilly curtains with the same ones I used in the lounge room from Curtain Wonderland.


and I polished the parquetry floor.

Bedroom 2 - Before


The last tenant left the blinds up like this hoping we wouldn't notice that the slats were all broken.


Burgundy painted feature alcoves?


Blue colour still inside the wardrobe.


Old wallpaper around the power switch and the carpet is revolting.

Bedroom 2 After


New eco-timber privacy blinds from Curtain Wonderland.


The walls and alcoves painted in Dulux Antique White.


New carpet laid - Beat Street 100% polypropylene in Sandcastle on premium underlay from Choices.

Bedroom 3 - Before


The same bad paint and carpet.


Vertical blinds - a personal pet hate of mine.


An old ceiling fan and only 2 wall lights.  No overhead lights. 

Bedroom 3 After


Bedroom 4 Before


Mustard walls with blue-grey carpet.


A non-working ceiling fan and only wall lights again.


Vertical blinds (aaarrrggghhh!!!!)

Bedroom 4 After


I also bought some new wall lights to get rid of the balls.


When I went to the house the other day, the electrician had been and installed them .... upside down!!!!  When I rang and told him they were upside down he said "that makes me look a bit stupid doesn't it?".  I thought - do you really want me to answer that?  It just goes to show, you really need to be there to supervise don't you?

We also did a little bit of work outside and in the garden.  Hopefully we will find some lovely tenants who will be very happy living there.  Now I can focus my attention back to my house and all the jobs that need to be done here.

Thursday, 10 November 2011

Rental Reno - The Kitchen

Part 3 of the renovation of our rental cottage was to makeover the kitchen.  Here are the before photos (be warned - you may need sunglasses for the bright yellow cupboards)


Bright yellow cupboards.


The tenant had dropped a slow cooker onto the ceramic hot plates and smashed it.  The problem was all the control knobs for the cook plate were on the oven, so we had to replace both.


Massive brass ring pulls and hinges.  Really old dishwasher that doesn't work properly.


More frilly valances.


but it's not all bad - a lovely big pantry.

The bones of the kitchen were good.  It's just the yellow and brass had to go.  So I grabbed a tin of Dulux Aqua enamel in Whisper White and went to work.  Here is the after.


I painted all the cupboards and hinges white.  I used a metal primer spray on the hinges and Zinsser 123 Bulls Eye primer on the cupboards, followed by Dulux Whisper White in gloss enamel.


 I replaced all the handles with black shell pulls.


I tried to leave as much of the timber features as I could but I had to paint out the trim on top of the pantry as there was just too detail to cut around.


The kitchen never had a splash back, so I bought these white subway tiles for 59cents each at Bunnings and had a tiler install them.


A new Omega stainless steel oven and ceramic cook top.


I pulled down the frilly valance.  The window is bare but it looks onto a very private back patio area.


A new Omega stainless steel dishwasher.

I can't believe how good the kitchen looks.  It really makes a difference to the whole house.

Sharing at
French Country Cottage - Feathered Nest Friday
The Shabby Nest - Frugal Friday
Miss Mustard Seed - Furniture Feature Friday
My Romantic Home - Show & Tell Friday

Wednesday, 9 November 2011

Rental Reno - The Bathrooms

Part 2 of renovating our rental cottage was the bathrooms.  We did not want to go to the expense of replacing the bathrooms, so we just did some repairs and maintenance, then spruced them up a little.

This is the Master Bedroom ensuite before:


There is only one towel rail and do you like the green gecko/frog stickers on the shower screen?


The floor tiles were still in good condition.


The only storage was this shelf on the side wall that had rusted.


There was damage to the wall where the shower was leaking and nobody had reported it to us!!!!  So we called in Megasealed to repair the shower leak and seal the shower base.  They guarantee the shower will not leak for 15 years. 

I removed the stickers from the shower screen and gave the whole shower recess a really good scrub (look you can see my reflection in the clean shiny glass).

Ensuite - After


We painted the walls and added a new toilet roll holder and double towel rail.


We pulled down the rusty shelf unit and mirror and replaced them with a mirror vanity cupboard from Highgrove Bathrooms.


That looks better.  Now for the main bathroom.  Here is the before...


This room was basically ok.  Whilst the tiles aren't very pretty they are clean and sound.  The timber vanity has aged well and the shower screen is still good.  All we had to do was paint the walls, add a new towel rail and remove the frangipani stickers on the mirror.


There is a separate toilet next to the bathroom - did nothing escape stickers?


To comply with water regulations, we changed the toilet to one with a dual flush cistern.  This closed coupled suite was only $149 from Highgrove bathrooms.


What a difference a coat of paint makes!  My lovely painter Frank hung all the towel rails for me and even chipped away all the broken tiles where the toilet floor meets the parquetry and painted the join to neaten it up.

Part 3 The Kitchen Transformation Coming Next - This was definitely the biggest change in the house.

Sharing at
Beach Cottage - Good Life Wednesday
Related Posts Plugin for WordPress, Blogger...